How to Build a JEE Main Rank Predictor...
April 28, 2026
Home >> ReactJS >> How to Create Chatbots in ReactJS

Quick Summary
In the modern digital landscape, chatbots have become a vital tool for businesses, offering immediate customer support and improving user experiences. If you’re aiming to develop a chatbot for your website or application, React.js stands out as a highly effective framework for this task. Renowned for its user-friendly and adaptable nature, React.js enables developers to build dynamic and interactive user interfaces with ease.
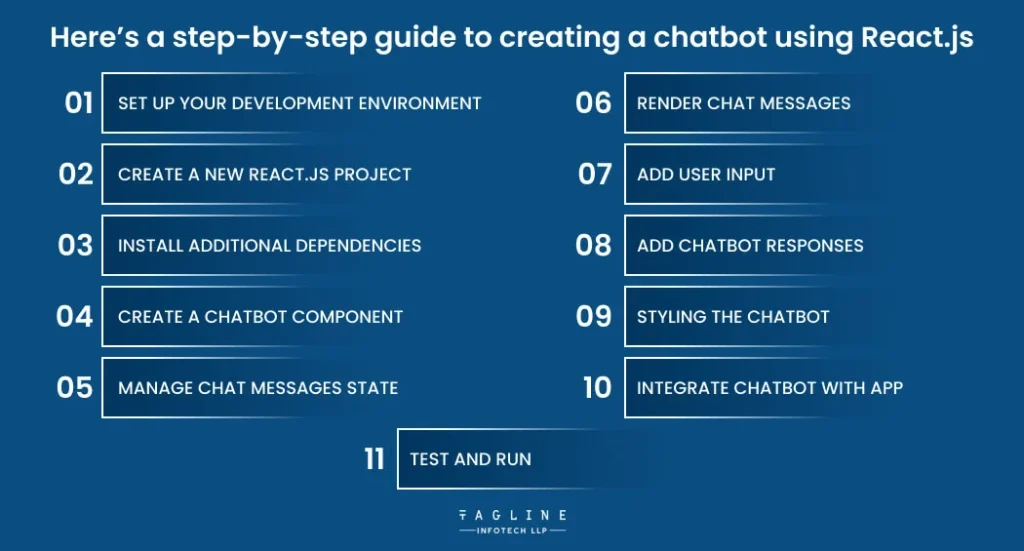
First, ensure Node.js and npm (Node Package Manager) are installed on your computer. These tools are necessary for working with React.js.
Launch your terminal or command prompt and use the following command to create a new React.js project:
npx create-react-app chatbot-app
This command will set up a new directory named `chatbot-app` with a standard React.js project setup.
First, navigate to your project directory by running `cd chatbot-app`. Then, install the required libraries for building a chatbot by executing the following command:
npm install react-chatbot-kit axios
This command will add `react-chatbot-kit`, which provides the necessary components for creating chatbots, and `axios`, which is used for making HTTP requests.
Next, create a new file named `Chatbot.js` in the `src` directory. This file will contain your chatbot component. Add the following code to `Chatbot.js`:
import React from 'react';

import { Chatbot } from 'react-chatbot-kit';

const ChatbotComponent = () => {
  return (
    <div>
      <Chatbot
        config={config}
        actionProvider={actionProvider}
        messageParser={messageParser}
      />
    </div>
  );
};
export default ChatbotComponent;
In this snippet, we import the `Chatbot` component from `react-chatbot-kit` and define a functional component named `ChatbotComponent`. This component renders the `Chatbot` component within a `div`, using configuration, action provider, and message parser props.
Create a folder named `hooks` inside the `src` directory. Inside this new folder, create a file called `useChatMessages.js`. Add the following code to `useChatMessages.js`:
import { useState } from 'react';

const useChatMessages = () => {

  const [messages, setMessages] = useState([]);

  const addMessage = (message) => {

    setMessages((prevMessages) => [...prevMessages, message]);

  };

  return { messages, addMessage };

};

export default useChatMessages;
This code defines a custom hook to manage chat messages. The hook initializes an empty array for messages and provides a function, `addMessage`, to add new messages to the state.
Now, update the `Chatbot.js` file to display the chat messages. Add the following code within the `ChatbotComponent` function:
    import useChatMessages from './hooks/useChatMessages';

    const ChatbotComponent = () => {

      const { messages } = useChatMessages();

      return (

        <div>

          <Chatbot

            config={config}

            actionProvider={actionProvider}

            messageParser={messageParser}

          />
          <div>

            {messages.map((message, index) => (

              <div key={index}>{message.text}/div>

            ))}

          </div>

        </div>

      );

    };
In this code, the `useChatMessages` hook is imported and called to obtain the `messages` state. The `messages` array is then mapped to render each message as a separate element.
To enable user input for messages, update the `Chatbot.js` file. Insert the following code inside the `ChatbotComponent` function, just below the code that displays the chat messages:
const handleUserMessage = (message) => {

  addMessage({ text: message, isUser: true });

};

const config = {

  // ...other config settings,

  inputPlaceholder: 'Type a message...',

};

const actionProvider = // ...your action provider setup

const messageParser = // ...your message parser setup

return (

  <div>

    <Chatbot

      config={config}

      actionProvider={actionProvider}

      messageParser={messageParser}

      handleUserMessage={handleUserMessage}

    />

    <div>

      {messages.map((message, index) => (

        <div key={index}>{message.text}</div>

      ))}

    </div>

  </div>

);
This code defines a `handleUserMessage` function to manage user input messages and updates the `config` object to include an input placeholder text. The `handleUserMessage` function is then passed to the `Chatbot` component as a prop.
To implement chatbot responses, create a new file named `ChatbotActionProvider.js` in the `src` directory. Add the following code:
import axios from 'axios';

class ChatbotActionProvider {

  constructor(createChatBotMessage, setStateFunc) {

    this.createChatBotMessage = createChatBotMessage;

    this.setState = setStateFunc;

  }

  async handleBotResponse() {

    const response = await axios.get('https://api.example.com/chatbot-response');

    const { message } = response.data;

    const chatbotMessage = this.createChatBotMessage(message);

    this.setChatbotMessage(chatbotMessage);

  }

  setChatbotMessage(message) {

    this.setState((prevState) => ({

      ...prevState,

      messages: [...prevState.messages, message],

    }));

  }

}

export default ChatbotActionProvider;
This class, `ChatbotActionProvider`, fetches chatbot responses and updates the chat messages state.
To style the chatbot component, create a CSS file named `Chatbot.css` in the `src` directory. Add the following styles:
.bot-message {

  background-color: #e0e0e0;

  padding: 5px;

  margin-bottom: 10px;

}

.user-message {

  background-color: #f2f2f2;

  padding: 5px;

  margin-bottom: 10px;

}
To add the chatbot component to your app, open `App.js`, import the `ChatbotComponent`, and place it within your app’s layout:
import ChatbotComponent from './Chatbot';

function App() {

  return (

    <div className="App">

      <ChatbotComponent />

    </div>

  );

}

export default App;
To test and run your chatbot application, execute `npm start` in the terminal. Open your web browser and go to `http://localhost:3000` to see your chatbot in action.
Creating chatbots in ReactJS offers a powerful way to enhance user interaction and streamline communication on your website or application. By leveraging ReactJS’s dynamic and responsive capabilities, you can build sophisticated chatbots that efficiently handle user inputs and provide seamless, engaging experiences. With the knowledge and techniques covered in this guide, you’re well-equipped to embark on your chatbot development journey, transforming the way you connect with your audience. If you need expert assistance, consider hiring a React.js developer to ensure your chatbot is built to the highest standards. Start building your ReactJS chatbot today and unlock a new level of user engagement!
April 28, 2026

February 2, 2026

January 30, 2026

October 30, 2025

September 19, 2025

Digital Valley, 423, Apple Square, beside Lajamni Chowk, Mota Varachha, Surat, Gujarat 394101
D-401, titanium city center, 100 feet anand nagar road, Ahmedabad-380015
+91 9913 808 2851133 Sampley Ln Leander, Texas, 78641
52 Godalming Avenue, wallington, London - SM6 8NW