Finance & IT Email Marketing: A Data-Driven Approach
February 2, 2026
Home >> Flutter >> Debugging and Testing in Flutter: Tips and Tricks

Quick Summary
In today’s internet-driven world, discussing the benefits of mobile applications is easy, but creating them poses challenges. Developers must adhere to distinct app development frameworks for Android and iOS. Even with a successful testing and quality assurance team, the challenge lies in shipping the product with minimal bugs. Enter Flutter, a game-changer that simplifies the work for developers and testers, especially in Debugging and Testing in Flutter
Flutter’s widespread popularity can be attributed to its capacity to create high-performing mobile applications for iOS and Android platforms using a single codebase. Google created the open-source Flutter framework for developing mobile applications.
The computer language Dart is used in its construction. As standard equipment, the framework has a fantastic assortment of widgets, tools, and libraries that help developers work more efficiently and quickly. That being said, creating apps with Flutter involves more than just code; you must also ensure the software is robust, scalable, and easy to use.
Creating practical applications for iOS and Android requires testing as a crucial step in the process. Testing enables identifying and fixing bugs and issues in the application before its release to the general audience. The Flutter framework provides various testing options so that developers may ensure their apps meet the necessary standards.
This post will cover the several types of testing available in Flutter, their respective advantages, and how to use them to test your Flutter application and produce high-quality code. Testing the applications is one of the most crucial parts of creating mobile applications with Flutter. According to the same logic, you should know which testing strategy can help you test Flutter applications more quickly.
Software defect tests are conducted using the Flutter testing procedure. This type of testing can be performed manually or by using automated processes. Finding and fixing any issues in the code is the aim of Flutter testing, which ensures that the finished product is of high quality.
The Flutter framework is tested by passing the code through a series of checks. You can choose to do these checks manually or automatically. Developers can use the test results to identify and fix errors in the code.
Testing ensures that software or applications are error-free, meet the technical specifications dictated by their design and development, and effectively and efficiently meet the user’s needs by managing all exceptional and borderline cases.
Fixing a software bug is the process of debugging. One term for debugging is “debugging.” One definition of it would be identifying, evaluating, and getting rid of errors. This activity starts when the software doesn’t work as it should and ends when the software is successfully tested, and the issue is fixed. Debugging is challenging and time-consuming because errors must be corrected at every stage.
The main differences between testing and fixing issues are as follows:

Consider a few considerations to build tests while creating an application. It would be beneficial if we reviewed a few of them before you initiate test runs.
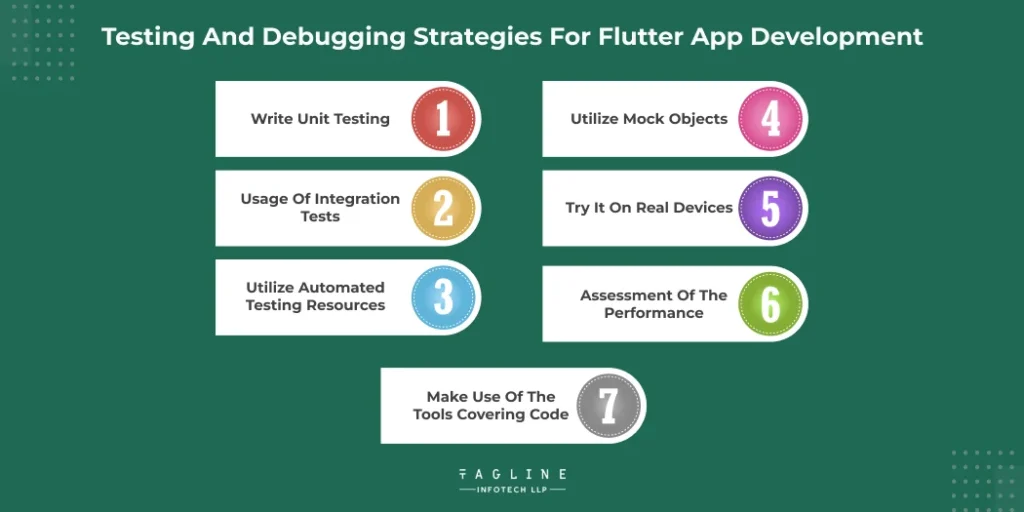
Unit tests are essential to the testing process for Flutter applications. These short, targeted tests aim to confirm that a specific code segment, like a method or function, is accurate. Unit tests can help identify mistakes early in development, saving you time and effort when troubleshooting afterward.
Integration tests to ensure that all application components can operate as intended. They are beneficial for assessing the functionality of navigation systems and user interfaces. Integration tests let developers verify that widgets, plugins, and services, among other application components, work seamlessly together.
The testing process can be simplified with automated testing tools, and less manual testing is necessary. The Flutter framework makes the Flutter Driver and WidgetTester accessible.
The Flutter Driver is a tool that may be used to develop integration tests that communicate with an application currently running on an actual device or an emulator. The WidgetTester tool allows you to write unit tests that test individual widgets separately.
You can automate time-consuming and repetitive testing methods by utilizing these technologies. These tasks involve navigating the application’s many displays, completing forms, and verifying the anticipated results.
Mock objects imitate the actions of actual items in the world of objects. They are accommodating when testing code that depends on databases, web services, third-party libraries, or other application programming interfaces (APIs).
Using mock objects, you can simulate the behavior of external services or APIs when working with Flutter. By utilizing mock objects, developers can test their programs independently and without relying on third-party services or APIs, reducing the time and effort required for testing.
Testing real devices is essential to testing Flutter applications. Using real devices can assess an app’s usability, performance, and dependability in a real-world situation.
Testing it on several devices and operating systems is crucial to ensure that your application works appropriately across various devices. For example, device labs allow you to automate testing across several platforms and devices, but having multiple iOS and Android devices at your disposal is also beneficial.
One crucial aspect of the user experience is the application’s performance. Customers’ annoyance with sluggish or slow-loading apps might result in low ratings and unfavorable reviews. Poor performance influences users’ behavior; as a result, if the performance is subpar, user interactions will be minimal and may even result in the user quitting the application.
When performing performance tests, it is advised to use profiling tools such as the Flutter Observatory to identify performance bottlenecks and improve the application’s overall performance.
Code coverage tools can help you ensure that your tests cover every line of your code. They produce a report detailing the percentage of code that was run as part of the testing process.
With code coverage tools, you may identify the parts of your application that are not being tested and add more tests as needed.
The following are recommended procedures for testing and debugging Flutter applications: testing and troubleshooting Flutter programs are several languages used in app development, and the field is vast. Flutter has garnered a great deal of attention in the last few years. When used by a skilled developer or a seasoned company like TechAhead, this open-source user interface software development kit can create incredibly powerful online and mobile applications. However, what measures can you take to ensure your Flutter application runs smoothly? The way to discover the solution is by testing and debugging.
Setting up an appropriate testing environment before the coding process is a crucial initial step to ensure flawless functionality. This allows developers to leverage Flutter development tools like the build modes provided by Flutter to accurately imitate real-world user interactions, isolate changes, and experiment without changing the main codebase.
Testing must be done consistently throughout designing a mobile application to find faults early on when they are more accessible (and less expensive) to fix. Maintaining good standards across all project teams is facilitated by implementing different tests at different project stages. This approach maximizes development productivity and ensures no breaking changes will be incorporated into production builds.
Some of the more intricate techniques that can be applied while assessing Flutter apps are as follows:
One way to isolate the code under test is to use a mocking technique to stub out dependencies. Mocking is an approach. The Mockito package can perform mocking.
You must first create a class that extends the simulate class and has its name before you can simulate an object. This class will contain the harmful code for the mock object.
Next, you need to create an instance of the mock object. This is possible with the help of the Mockito.mock() function.
Finally, you must stub out the methods connected to the simulated object. The Mockito. When the () function allows you to achieve this.
One method to find out where performance bottlenecks are in an application at any given time is by profiling. Applications that can be used for profiling include the Android Profiler tool on Android and Apple’s Instruments tool on iOS.
Several tools are available in Instruments and Android Profiler for assessing an application’s performance. The initial stage of utilizing Insutilizing to profile an application starts with the tool’s launch. You must choose the application you want to profile as the target in the next stage.
Once the application that will be the target has been selected, you will need to pick the kind of profiling that you want to do. A few different types of profiling can be done, such as memory usage, CPU consumption, allocations, and time profiling.
Once you’ve determined what kind of profiling you want to do, the next step is to choose the file directory where you want to save the results. After that, you’ll need to hit the record button and give the profiler a few minutes to complete its work. After selecting the type of profiling you wish to do, the next step is to press the record button and wait for the profiler to finish running, which may take a few minutes.
During the testing of Flutter applications, several main problems crop up repeatedly. These issues are all as follows:
It is crucial to have a firm grasp of the principles of testing and debugging before diving into this important development area. There are many different ways to test your Flutter applications. Manual and automated methods are available, and each has advantages of its own. However, unit tests ensure that each component operates as intended, while automated testing helps save time and resources by spotting issues early. We also examined whether Flutter tests could be conducted using Appium. This is a fascinating question that opens up new avenues for our toolkit. We discovered several tactics, such as breakpoints and message logging, for effectively troubleshooting issues with our apps. For expertise tailored to your project needs, consider the advantage of hiring Flutter Developers well-versed in these critical practices.

Digital Valley, 423, Apple Square, beside Lajamni Chowk, Mota Varachha, Surat, Gujarat 394101
D-401, titanium city center, 100 feet anand nagar road, Ahmedabad-380015
+91 9913 808 2851133 Sampley Ln Leander, Texas, 78641
52 Godalming Avenue, wallington, London - SM6 8NW