Finance & IT Email Marketing: A Data-Driven Approach
February 2, 2026
Home >> React Native >> How to construct iOS apps using React Native
Quick Summary
This post will discuss creating iOS apps with React Native, a famous open-source framework developed via Facebook. It emphasises the blessings of utilizing React Native iOS app improvement, pass-platform talents, local-like overall performance, reusable components, and a thriving developer community. For businesses and individuals looking to streamline app development or hire React Native developers, the post covers essential steps for installing React Native on macOS and Windows/Linux for Native iOS development. It also explores popular React Native libraries, the use of npm applications for your React Native undertaking, and highlights why many developers prefer building iOS apps with React Native due to its unique functionalities. Finally, it walks you through getting your React Native app on the App Store, from joining as an Apple Developer to filing your undertaking to iTunes Connect. Overall, it is a radical introduction to React Native app development for iOS.
React Native is an open-source framework advanced by Facebook that uses a declarative programming model to construct native JavaScript mobile apps. If you want to learn React Native, you’ll discover it combines the finest factors of native development with React, a top-tier JavaScript toolkit for creating user interfaces.
Most companies growing mobile apps on modern native stacks should make a few compromises.” Either on productivity (creating the same product with different builders on different stacks at various times), quality (developing low-quality apps), or scope (focusing on a single platform). In an interview, Tal Kol, ex-head of Mobile Engineering at Wix.com, argues, “The course to preventing those compromises is inventing new mobile stacks — like React Native.” For instance, React Native build iOS on Windows offers a unique approach to cross-platform development.
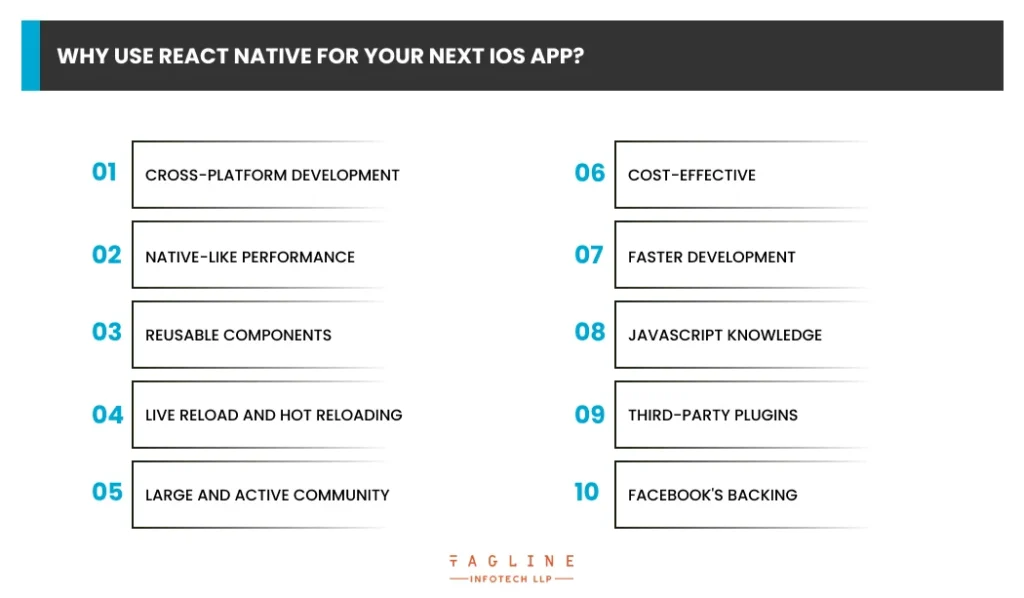
React Native is a famous choice for growing iOS apps for several reasons. If you’re looking to build iOS apps, React Native offers key benefits such as cross-platform compatibility, a rich ecosystem of libraries, and faster development times. Here are a few key advantages to consider for your next iOS app project:
Before diving into React Native app development, particularly to build iOS apps using React Native for iOS on Windows, you must complete the essential React Native setup by installing the necessary tools and software. Here’s a step-by-step guide on how to execute a React Native iOS build on Windows.
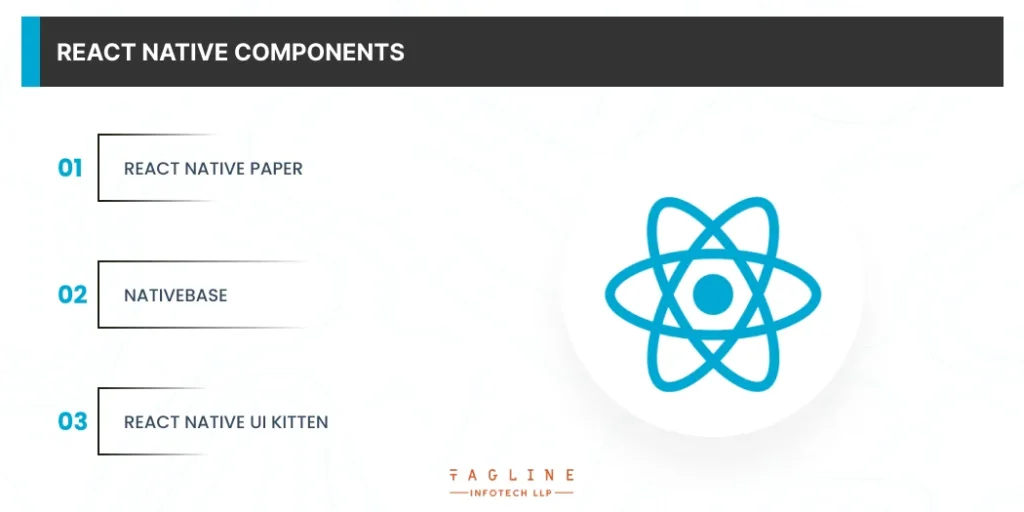
React Native gives a number of built-in Core Components prepared to be used in cell app development. Here are some famous React Native element libraries:
To use an npm bundle from a record to your application, you import the call of the package:
Import moment from ‘second’;
// that is equivalent to the standard node requires:
const moment = require(‘moment’);
This imports the default export from the package deal into the image moment.
You can also import specific capabilities from a package dealing with the usage of the destructuring syntax:
import isArray from ‘lodash’;
You also can import other files or JS access points from a package:
import parse from ‘graphql/language’;
React Native provides developers with the ability to use native APIs, offering access to platform-specific features and functions without needing to switch between different codebases. By utilizing these native APIs, you can enhance the functionality of your app, ensuring a seamless experience for both iOS and Android users. This makes it an excellent choice for building native iOS apps, allowing developers to deliver high-quality, responsive experiences across platforms.
Native APIs in React Native are used to bridge the gap between JavaScript and the native platform, allowing you to interact with device hardware like cameras, GPS, and accelerometers. You can also access features such as push notifications, sensors, and storage.
To use these APIs, React Native offers modules that simplify the integration process. Whether it’s managing app performance, handling background tasks, or integrating third-party libraries, native APIs enable React Native apps to behave more like native mobile applications. This results in improved performance, user experience, and overall efficiency.
Incorporating native modules into your React Native app helps you take full advantage of the capabilities of each platform, making your app more powerful and feature-rich. Additionally, React Native’s seamless integration with native code allows developers to write platform-specific code only when necessary, saving time and resources while maintaining the app’s cross-platform nature. This approach is particularly useful when performing iOS app testing, as it ensures that the app works optimally across different devices and operating systems.
By leveraging the native APIs offered by React Native, you ensure your app can perform complex tasks without compromising performance or user experience.
Also Read : How to Create React Native App From Scratch
So you have built a React Native IOS app. Congratulations! But what is the subsequent step? How do you get it into the fingers of your customers?
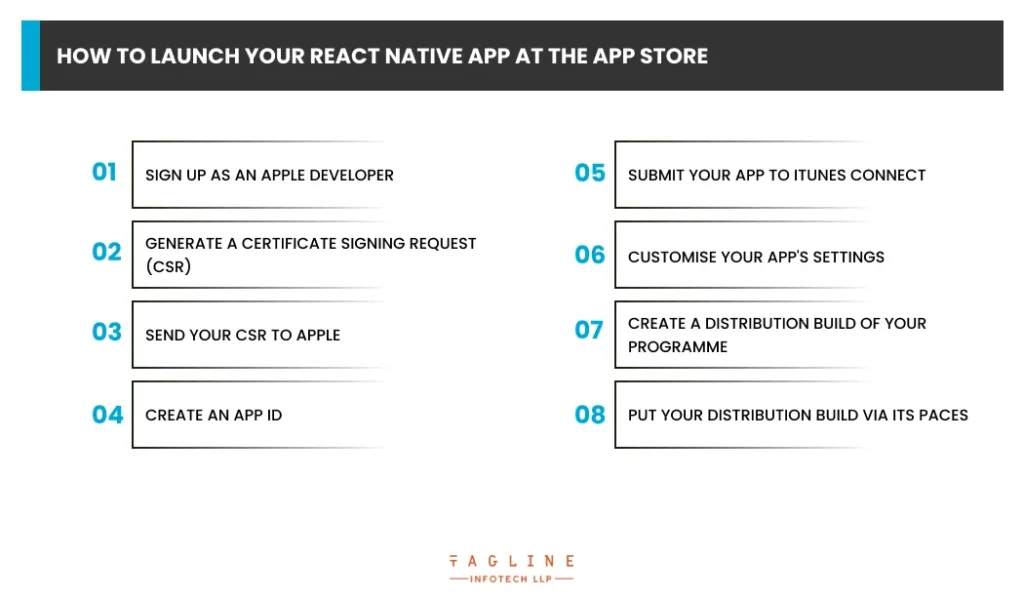
The technique for publishing your app at the App Store is rather simple, but there are a few steps you should take. Let’s have a have a look at them:
1. Sign up as an Apple Developer.
2. Generate a Certificate Signing Request (CSR).
3. Send your CSR to Apple
4. Create an App ID
5. Submit your app to iTunes Connect.
6. Customise your app’s settings
7. Create a distribution build of your programme.
8. Put your distribution build via its paces.
Building iOS apps using React Native offers a powerful and green way to create move-platform mobile packages with local-like overall performance. With its tremendous community, sturdy libraries, and support from Facebook, React Native is an enormous desire for your subsequent iOS app development assignment. Get in touch with a React Native development company who can deliver fully-featured application according to your business requirements. By following the steps mentioned in this newsletter, you could install your improvement surroundings, leverage famous factor libraries, and in the end, post your app at the App Store. Start build iOS app with React Native today and faucet into the arena of mobile improvement opportunities.
Yes, there are famous issue libraries like React Native Paper, NativeBase, and React Native UI Kitten that provide pre-built UI components and patterns for your React Native initiatives.
To put up your React Native app at the App Store, you will want to join up as an Apple Developer, generate a Certificate Signing Request (CSR), create an App ID, submit your app to iTunes Connect, customise app settings, create a distribution construct, and punctiliously test your app earlier than launch.
Windows and Linux cannot directly develop iOS apps, but you can use cloud services or a Mac for building.
Use the command npx react-native init ProjectName to create a new React Native project for iOS development.
Install Xcode, set up the iOS simulator, and configure necessary dependencies for React Native development.
Use native modules in React Native by linking them through the bridge to interact with native iOS functionality.

February 2, 2026

January 30, 2026

October 30, 2025

September 19, 2025

September 10, 2025

Digital Valley, 423, Apple Square, beside Lajamni Chowk, Mota Varachha, Surat, Gujarat 394101
D-401, titanium city center, 100 feet anand nagar road, Ahmedabad-380015
+91 9913 808 2851133 Sampley Ln Leander, Texas, 78641
52 Godalming Avenue, wallington, London - SM6 8NW